You are here: SKB Home » HRMS Payroll » User Guide » Time Attendance Activation
Time Attendance Activation
Activation of Time Attendance option is done in General Parameters. By default, the system is configured to manage a manual payroll, without any information about clock card data or daily transactions.
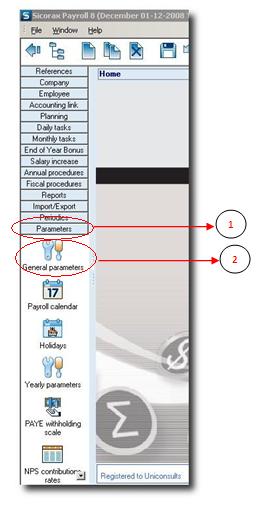
- Step 1: Click on Menu Parameters
- Step 2: Click on icon General Parameters
Time Attendance Activation (Daily Transactions)
- Step 3: Set this checkbox active to enable the clock card module
- Step 4: Activate this option to deal with leaves only, without any necessity to deal with clock card data.
- Step 5: Activate this option for those who deal with overtime on a weekly basis (optional)
- Step 6 (optional):
- Tasks in ovt week target: Insert Tasks Codes used to help calculate the week target here.
- Tasks covered by ovt 1.0: Insert Tasks Codes deducted from the cumulated weekly overtime which will be paid in rate 1 here.
- Tasks affecting week target: Insert Tasks Codes which will be deducted from the week target here. The main reason is for not penalizing someone who has taken a local leave for example.
- Tasks to deduct from ovt: Insert Tasks Codes which will be deducted from the week target here. For example Absences, Latenesses, Permissions etc…
- PD affecting ovt rate: Insert Payment Deduction codes affecting the overtime rate calculation here.
Time Attendance Activation (Clock Card)
The next step is to configure the Clock Card part.
- Step 7:
Input the recorder tolerance value (in minutes). This tolerance is the time allowed between two clockings for the same badge number and is configured in the Time Recorder machine itself. The default value is 15 minutes.
- Step 8:
Input the clock in tolerance (in minutes). This tolerance is the time allowed between two clockings for the same badge number. For example if the Clock In Tolerance is 15 minutes, clock in present at 7:30 and again 7:40: The system will take into consideration only the first clocking - thus ignoring all clockings between 7:30 and 7:45. But as from 7:45, clockings will be taken into consideration. Default value is 15 minutes
- Step 9:
Input the clock out tolerance (in minutes). This tolerance is the time allowed between two clockings for the same badge number - but this time it concerns Time out. Default value is 10 minutes.
- Step 10:
Input a default file extension (default is .dat) for all time attendance import text files.
Configure also the time attendance text file name format. By default the system imports daily TA files with name like 20090112.dat and month TA files with name like sep2009.dat.
- Step 11:
Check the Skip breaks and permissions during time in/out loading when you do not want to manage clockings for breaks and permissions. Only 1st time in and last time out are processed


