You are here: SKB Home » HRMS Payroll » hrmsprocguide » EDF Adjustment (applicable after payroll of July is closed)
EDF Adjustment (applicable after payroll of July is closed)
- EDF adjustment can be performed using the following options:
- MRA E-EDF facility (EDF file is downloaded from the website of the MRA and imported through Sicorax HRMS Payroll)
- Manual input through Employee EDF
MRA E-EDF Import
- To perform the import of the MRA E-EDF Excel file, you must download the file from the the website of the MRA. Ensure the file is valid and contains the necessary information. Should you need assistance regarding the download of the MRA E-EDF Excel file kindly contact the MRA.
- The MRA E-EDF Excel file must be in xlsx format.
- An illustration of the file is shown below.
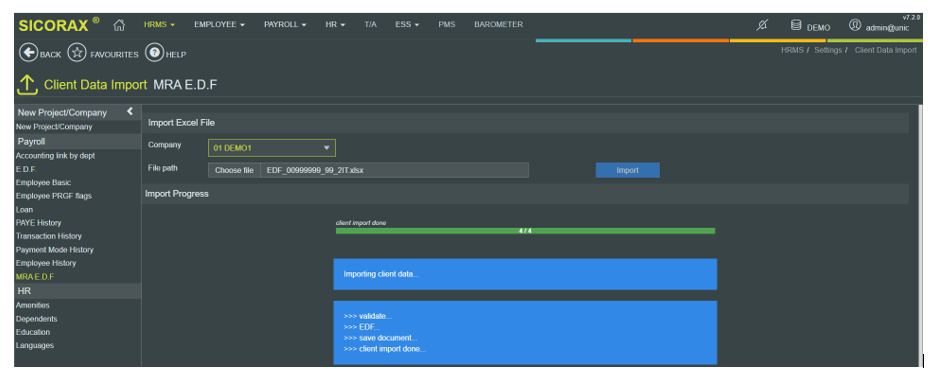
To perform the import, use the following steps:
- Step 1: Go to HRMS
- Step 2: Click Settings
- Step 3: Click Client Data Import
- Step 4: Click MRA E.D.F
- Step 5: Click Client Data Import
- Company: Choose the company from the list
- File path: Browse the file location of the downloaded MRA E-EDF Excel file and select the file
- Step 5: Click Import button
View the imported MRA E-EDF records through Sicorax HRMS Payroll
Use the following steps:
- Step 1: Go to Payroll
- Step 2: Click Monthly Procedures
- Step 3: Click EDF
- Step 4: Select Employee
- Step 5: View the imported MRA E-EDF data as illustrated below
MRA E-EDF Import (New Recruit)
New recruits created on Sicorax HRMS Payroll after payroll of July is closed, may have their EDF input manually through Employee EDF or imported using the MRA E-EDF import procedure. After completion of the manual input or import, it is compulsory to go through the new recruit's EDF record through Employee EDF to ensure additional flags are activated e,g First Employment Flag (Flag is activated when employee submits an EDF for the first time in the current fiscal year).
To view the new recruit's EDF and activate the necessary flags, follow the steps below:
- Step 1: Go to Payroll
- Step 2: Click Monthly Procedures
- Step 3: Click EDF
- Step 4: Select Employee
- Step 5: Activate the First Employment Flag (if needed)


