You are here: SKB Home » HRMS Payroll » Procedure Guide » Monthly MRA Special Allowance Statement
Monthly MRA Special Allowance Statement
Following Circular letter of the MRA to all employers dated 24 January 2018, the MRA informs that the payment of special allowance to supplement minimum wage as provided under the Additional Remuneration and Other Allowances Act 2017, will be effected as from the end of January 2018.
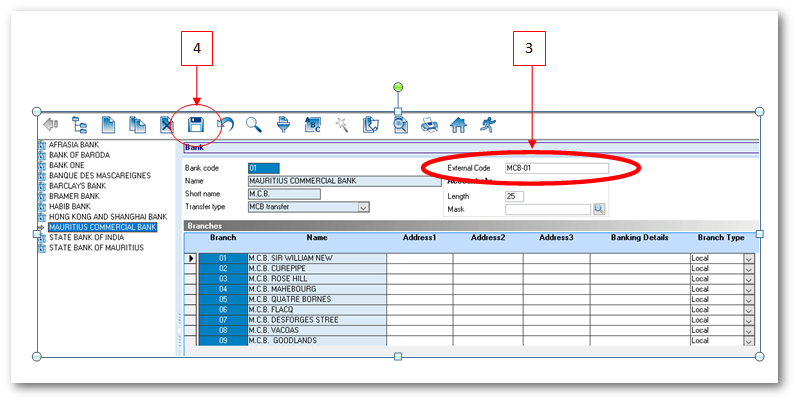
However, before exporting the MRA Special Allowance Statement for the fisrt time, it is compulsory to insert the appropriate bank code of each bank in Sicorax Payroll through References | Bank . To do so use the steps below:
MRA Bank Codes
The following is the list of official bank codes provided by the MRA for the purpose of the MRA Special Allowance Statement. The list is available on the website of the MRA through the following link www.mra.mu/download/excelTemplateSpecialAllowance.xlsx
- The Mauritius Commercial Bank Ltd: MCB-01
- ABC Banking Corporation Ltd: ABC-01
- The Hongkong and Shanghai Banking Corporation Limited: HSBC-01
- Standard Chartered Bank (Mauritius) Limited: SCB-01
- Banque des Mascareignes Ltee: BMAS-01
- Barclays Bank PLC: BARC-01
- State Bank of Mauritius: SBM-01
- SBI (Mauritius) Ltd : SBI-01
- MauBank Ltd: MPCB-01
- Investec Bank (Mauritius) Limited: INVB-01
- Bank of Baroda: BOB-01
- Habib Bank Limited: HABB-01
- Bank of India International Ltd: INIL-01
- Standard Bank (Mauritius) Limited: SBL-01
- Bank One Limited: BOL-01
- Afrasia Bank Limited: AFRB-01
How to insert MRA Bank Codes through References | Bank
Step 1: Go to References
Step 2: Click Bank icon
Step 3: Insert External Code as per above illustration, as per official list
Step 4: Click Save
NB: Repeat steps 3 and 4 for other banks
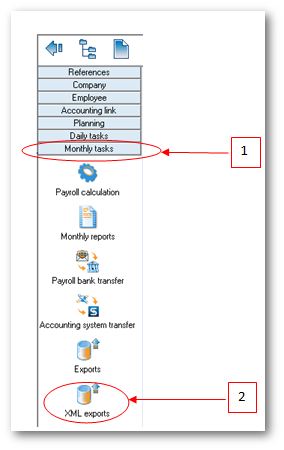
To export the Monthly MRA Special Allowance Statement, use the steps below.
Step 1: Go to Monthly Tasks
Step 2: Click XML Exports icon
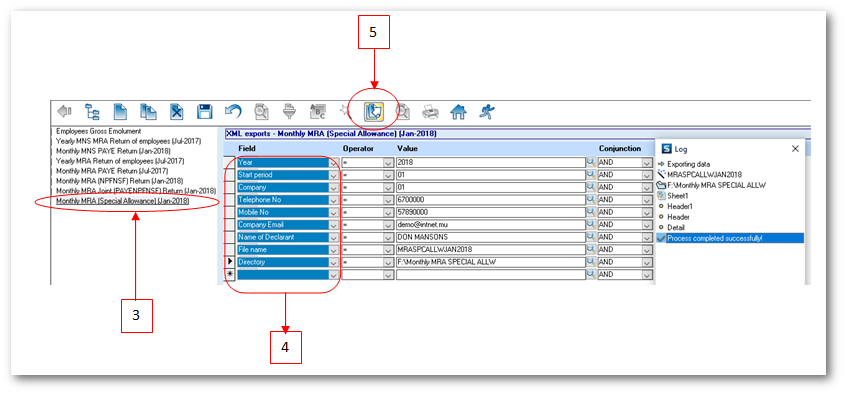
Step 3: Double-click Monthly MRA Special Allowance (Jan 2018)
Step 4: Insert the following criteria:
- Year: Choose calendar year from the list
- Start Period: Choose month from the list
- Company: Choose company from the list
- Telephone number: Insert number, it should be equal to 7 numeric characters
- Mobile number: Insert number, it should start with the figure 5 and should consist of 8 numbers;
- Company Email address: Insert the contact email address of the company
- Name of Declarant: Insert the name, it should bear UPPER CASE letters and/or numeric characters (max 50 characters)
- File name: Insert file name, it should be less than 21 characters long
- Directory: Click lookup icon to browse and select the folder to which you want to export the file
Step 5: Click Export button from the toolbar
NB:(1) The file contains employees whose Monthly Basic Salary is less than Rs 9000. For those whose National ID is missing in the system a message will be shown in the log indicating invalid NID and the export file will be incomplete. You will need to update the NID in the Employee master file and export the file again (2) The log window indicates anomalies on the export file, e.g invalid NID, wrongly inserted Name of Declarant, Telephone number, etc.
A sample of the csv file is shown below:


